
Testing for gestational diabetes – it’s one of the more challenging and confusing aspects of pregnancy. With my first pregnancy, I chose the traditional oral glucose tolerance test (OGTT), the 1 hour test with the 50g Glucola. I remember having so many questions.
- Do I have symptoms of gestational diabetes? Risk factors?
- What if I fail the test and have gestational diabetes?
- Is the gestational diabetes test ever wrong?
- How would having gestational diabetes change my birth plan?
- Can I do anything to ensure I pass the OGTT?
It was a pass/fail test and I had no way to control or predict the outcome. When I went in for the test, I felt confused and powerless.
Fortunately, I passed. And with a fairly comfortable margin, no less!
Unfortunately, a bit less than 4 months later, I delivered a healthy but large 9lb 8oz baby boy a day before my due date.
Where the Oral Glucose Tolerance Test Goes Wrong
Looking back, I’m not confident all was well with my blood sugar, even with the negative gestational diabetes screen.
According to a 2025 article in Best Practice & Research Clinical Endocrinology & Metabolism, the OGTT has a “substantial proportion of false-positive and false-negative results.” That’s not what I want from a test that has such an impact on the short- and long-term health of my baby, as well as on the outcome of my pregnancy!
In particular, the study found that women who at high-carbohydrate diets were more likely to get a false-negative result because the OGTT did not “sufficiently challenge their glucose metabolism to reveal dysglycaemia.”
If you had asked me about my diet then, I don’t think I would have characterized it as high-carbohydrate. High-carbohydrate sounds like an unhealthy diet, and I thought I was eating very well. I was following the recommendations and eating lots of fruits and vegetables!
Unfortunately, in America, the recommended diet is a high-carbohydrate diet, as fat is limited and protein is not sufficiently encouraged. After reading Lily Nichols’ Real Food for Pregnancy, I realized that I was eating a lot of carbs, often in a way that would be more likely to result in blood sugar spikes (i.e. large green smoothies with nonfat milk and a full banana for sweetness).
On the other hand, if you already follow a low-carbohydrate or low-glycemic diet, you may end up with a false-positive on the OGTT because your body simply isn’t used to the carb load. Quickly consuming 50g of minimally diluted glucose in liquid form is a lot for the body to handle! Lily Nichols shares her experience choosing and failing the OGTT in her two-part blog post.

Three Options to Test for Gestational Diabetes
Please note that I am a mom, not a healthcare professional. I’ve done a lot of research, but you should speak to your healthcare provider before making any decisions.
Now in my second pregnancy, my diet is completely different – largely thanks to Lily Nichols. I choose to eat low-glycemic, real foods and never eat “naked carbs” (carbs without sufficient fiber, protein, and/or fat). Liver is a regular part of my diet. All baked goods in our house are made with sourdough-fermented fresh-milled flour, and we very seldom eat out.
My midwife and I began conversations about the gestational diabetes test very early in my pregnancy, given my first baby’s size and my dietary changes. As she saw it, I had three options, each with their pros and cons.
1. Oral Glucose Tolerance Test (Glucola or Fresh Test)
Pros:
- I had done it before, so it was familiar.
- It’s the “standard of care,” so it’s what most pregnant women do.
- It’s one test and it’s done in an hour. Conveniently, it’s also the length of my normal prenatal appointments, so I’d drink the glucose at the beginning of the appointment and have the blood draw at the end.
Cons:
- It’s a single data point – my blood sugar response to a drink I don’t normally have at one particular time on one particular day. Stress, sleep, my previous meal, or any number of factors could influence it.
- My diet could easily skew the results. While I may have had a false-negative before, I was more likely to end up with a false-positive this time around.
- Drinking 50g of glucose in a 10oz drink is nasty, no matter how clean the Fresh Test is – that’s more concentrated than Coca-Cola (38g of sugar in a 12oz can) or Pepsi (41g of sugar in a 12oz can).
- Would I trust the results, or end up opting to follow up with more testing using one of the following two options?
Cost: $27 for the Fresh Test, plus the cost of the lab if you’re paying out of pocket. If using a traditional healthcare provider, it may be covered by insurance as preventative care.
2. Self-Monitoring with a Finger-Prick Glucometer (4 times per day for 2 weeks)
Pros:
- It would give me a more accurate idea of what my blood sugar response is to my typical diet (compared to the OGTT)
- It would give me a lot more data points than the OGTT (56 readings vs. 1) because I would test fasting (first thing in the morning) and after all three meals for two weeks straight.
- I have a finger-prick glucometer already, so I would just need to buy more test strips.
Cons:
- 56 finger pricks is a lot of finger pricks, and that’s assuming I do it correctly every time and don’t need to stick myself a second time
- I would need to remember to check 1-2 hours after the start of every meal, which isn’t the easiest thing with a toddler
- I would only know my reading at the point I checked, not the peak or my overall glucose response.
- It would not account for snacks. That’s not a huge deal for me because I’m usually not a big snacker, but I might be when I’m 24-28 weeks pregnant.
Cost: Varies depending on glucometer, but about $20-30 for a glucometer, lancets, and test strips.
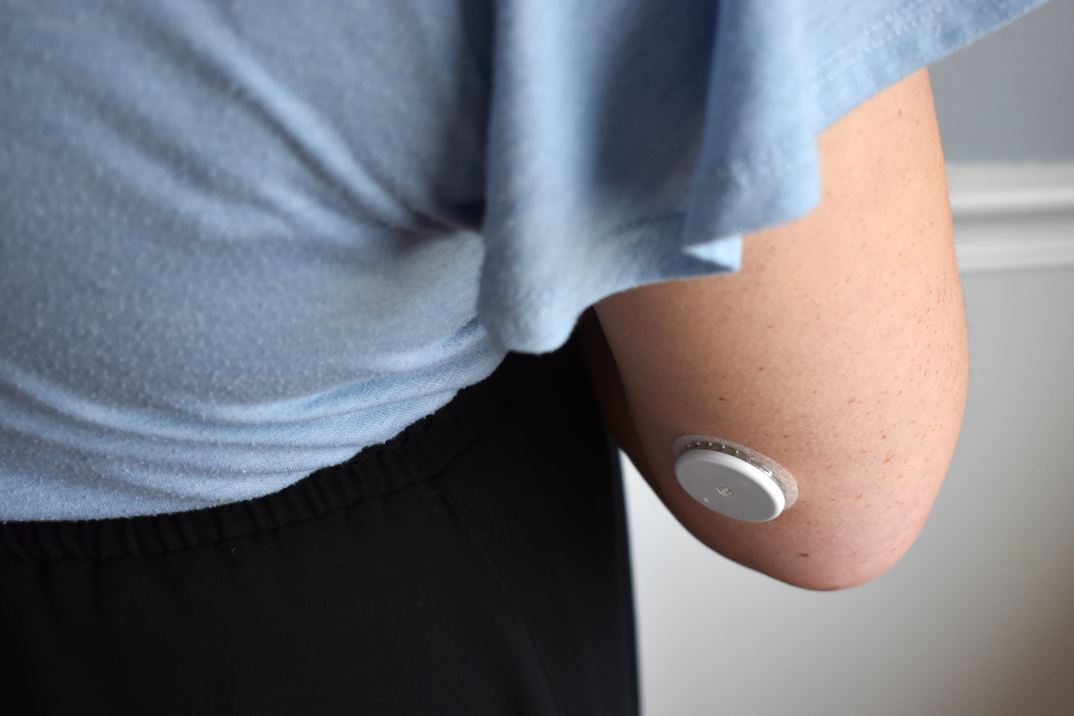
3. Self-Monitoring with a Continuous Glucose Monitor (2 weeks)
I didn’t think using a continuous glucose monitor (CGM) would be an option for me, since I thought that those were prescription only. However, there are now two over-the-counter CGMs: the Lingo (Abott) and the Stelo (Dexcom). Both are very reasonably priced (under $50 for a 2-week sensor) and available on Amazon.
Pros:
- I would have two weeks of continuous data, showing how a wide range of factors impact my blood sugar. Sleep, stress, exercise, meal combinations and timings, snacks, and more would all be accounted for!
- If I do have gestational diabetes (or even just minor blood sugar issues), I would know more about what helps and what hurts me. That would mean less time experimenting and more time in range.
- I would be able to see just how high my blood sugar peaked and when that peak occurs, depending on my food.
- I would know what my blood sugar does at night and if it impacts my sleep.
Cons:
- It was the most expensive option, but only by a bit
- It’s a lot of data – would I know what to do with it or just feel overwhelmed?
- I would need to track a lot of data in order to get the most out of the experiment and see correlations.
Cost: Currently $44 for the Lingo CGM, but (spoiler) there was a buy one, get one 50% off deal when I bought it, so my husband will be doing it with me! The alternative, the Stelo CGM, is $99 for a two-pack.

Choosing the Continuous Glucose Monitor to Test for Gestational Diabetes
Given the three options, I am choosing to the over-the-counter Lingo continuous glucose monitor to test for gestational diabetes.
After consulting with my midwife, the opportunity to have so much data is simply too good to pass up. And knowing myself (and especially after reading that 2025 article comparing the CGM and OGTT), if I had any concerns with the other two testing methods, I knew I would follow up with a CGM so I could see my full blood glucose response pattern.
The plan is to eat my normal diet for the first week – including occasional treats or snacks as I would normally eat them. If all looks good, I will eat some more “challenging” meals that are outside of my normal diet to see how my body responds in the second week. If I’m having blood sugar issues, the second week will be for making changes and finding what keeps me in range.
My husband, Kyle, will be testing himself alongside me so we can compare data. It will be interesting to see how similar or different our responses are to our diet!
It is truly wonderful that CGMs are now available over-the-counter at an affordable price. Whether pregnant or not, they provide people with an incredible tool to take control of their health in a much more comprehensive manner.
What was it like using a continuous glucose monitor to test for gestational diabetes?
I learned a lot – find out more in my post here!
In the meantime, I’d love to hear from you in the comments below. What was your experience testing for gestational diabetes? Would you do anything differently if you were to do it all again?


Leave a Reply