
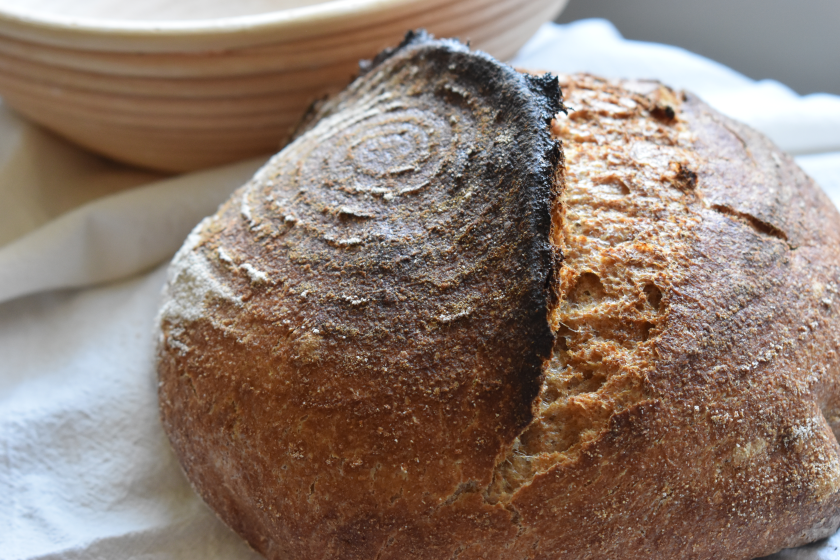
When I first looked into making fresh-milled sourdough bread, I was overwhelmed by the precision and general fussiness of the recipes. Strict time scales, precise measurements, optimal starter feeding ratios, complex flour blends – it was all a bit overwhelming.
As the mom of a toddler with a new baby on the way, I needed a bread recipe that was simple, flexible, and forgiving. I don’t need every loaf to be Pinterest-perfect (though I have had quite a few beautiful boules) – I just need the bread to taste good! And trust me, this recipe always tastes good, especially with a nice bowl of soup.
If that resonates with you, give this recipe a try. Before I switched to fresh-milled flour, I used Feasting at Home’s recipe, so this recipe is based on hers with adjustments for fresh-milled flour. I can’t promise that your fresh-milled sourdough bread will always be pretty, especially if you push the recipe’s bounds. But it will always be delicious and healthy!

Where can I buy wheat berries for an affordable price?
It can be challenging to find wheat berries at a decent price point in many areas of the country! Where we live in the Midwest, there are no stores nearby that carry them. In areas we’ve visited that have grain stores, the cost is significantly higher than the cost of normal flour. And at many online stores, shipping costs are astronomical! The cost of sourcing wheat berries was the thing that prevented us from making the switch to fresh milled flour for the longest time. I just couldn’t justify spending a small fortune on flour for all the bread our family likes to eat.
Luckily, Azure Standard has been the answer to our prayers. For a small shipping fee (which is not required for every drop), we get organic hard red wheat berries for only slightly more per pound than non-organic Kroger-brand unbleached flour.
For reference, at the time of writing this, the Azure organic hard red wheat berries are $0.83/lb for a 25lb bag (easier for me to lift) or $0.74/lb for the 50lb bag. Kroger’s non-organic unbleached flour is about $0.70/lb, while the Simple Truth Organic unbleached flour is $1.16/lb. I couldn’t find an organic whole wheat flour, but a popular brand of non-GMO whole wheat flour is $1.36/lb. That price difference adds up fast if you make bread regularly, so I often feel like I’m saving money by using fresh-milled flour!

What’s the secret to making good fresh-milled sourdough bread every time?
I think the secret to making good bread is to practice, practice, practice! Everyone’s environment – humidity, temperature, etc. – is different and everyone’s sourdough starter is different. And that can even change on an individual basis from day to day and season to season! With fresh-milled flour, there can be differences in the grains or in mill.
There are so many factors that impact how bread behaves that unless you’re in a completely controlled environment on a strict schedule with tightly regulated ingredients, you’re probably going to deal with things not quite going to plan. And that’s okay!
As you practice, observe and learn how your bread looks and feels at every step and you’ll notice when something unexpected is happening – rising too fast (or over-proofed), rising too slow, too wet, too dry, etc. You can usually counteract it if you catch it early!
Not every loaf of bread will be beautiful, but I am delighted to report that I’ve never had a wasted loaf. In fact, they’ve all tasted amazing. Even the ones that ended up a little flat, my “frisbee” loaves, have been delicious.
My fresh-milled sourdough bread over-proofed. How can I salvage it?
I know my bread is over-proofed if it begins to break apart when I do the second stretch-and-folds. If that happens, I take a moment to figure out just how over-proofed it is.
If your bread is just a bit over-proofed and is only breaking a bit, it may be okay to bake as normal. Stop messing with it and stick it in the fridge for an hour or so before doing the second set of stretch-and-folds. If it cooperates well enough, it will be just fine (aside from possibly being a bit flatter than normal).
If you left your bread proofing a bit too long and came back to a completely deflated mess, don’t worry. When this happens to me, I just think “O felix culpa (O happy fault)” – time to make delicious focaccia! Just grease a baking sheet, pour the bread on, and stretch it out over the whole surface. Brush it with butter, sprinkle it with salt, and bake for 20-30 minutes at 450°F, turning once halfway through.

What grains should I use for fresh-milled sourdough bread?
Our family likes organic hard red wheat because of the beautiful color and robust flavor. It’s also the cheapest grain we can get with Azure Standard – and it’s very close to the price of store brand unbleached all-purpose flour! That alone feels like a miracle considering the cost of organic whole wheat flours at the store, especially considering those flours are missing many of the quickly-degrading vitamins and minerals present in freshly-milled flour.
If you prefer a milder taste or a bread that looks less “whole wheat,” hard white wheat is a good option. It has a similarly high protein content to the hard red wheat, which gives your bread its structure and lift. When I last checked, it was a bit more expensive than the hard red, but not by much!
There are lots of other grains out there as well, though I have not experimented with them. Let me know in the comments what grains you like to use!
How long is fresh-milled sourdough bread good for?
I find that my fresh-milled sourdough bread is generally good for up to a week if wrapped in a towel or placed in a plastic bag. It does start to get stale after a day or so, but a quick toast (and possibly some butter) always brings it right back to life.
I’ve never had fresh-milled sourdough get moldy, even after 1 week, but it will depend on your environment. The acidity of the sourdough is great natural preservation, but it can’t keep it from spoiling indefinitely. This is real food we’re dealing with!
For long-term storage, you can freeze an uncut, completely cooled loaf for up to 6 months. Lisa from Farmhouse on Boone has a great post on this topic!

Ingredients
- 100g sourdough starter – Give or take 10g. Bread made with active starter will rise faster, but fridge-cold works too and is often what I use. Even relatively fresh discard will eventually rise, but it may require some patience.
- 435g filtered water – Give or take 20g. I use filtered water because unfiltered water can have contaminants and chemicals that kill the yeast, but it may still work if that’s all you have access to. I use water from a Brita pitcher and that has always worked for our family’s bread! If your starter is coming from the fridge, slightly warmed (not hot!) water will help to wake up the yeast.
- 520g hard red wheat – Hard white wheat should work too. If you don’t have fresh-milled flour, a high-protein bread flour will probably work, though you may have to tinker a bit with the hydration ratios!
- 15g fine sea salt – Give or take 5g. Don’t use iodized salt or salt with anti-caking agents as they may kill the yeast. Do not omit the salt – I once forgot it and it was the blandest bread I’ve ever made. Salt is flavor, my friends!

Directions
Step 1: Combine starter and water in a large bowl.

Step 2: Add the flour and salt. If you have an open grain mill, like the Mockmill, you can place the bowl below your grain mill to catch the flour as it comes out. No need to dirty an extra dish!

Step 3: Mix the starter, water, flour, and salt together to combine. The dough will be thick and a bit sticky. Just do your best to get all the dry bits incorporated. It will smooth out as we do the stretch and folds.

Autolyze
Step 4: Cover the dough and allow it to autolyze (rest) for about an hour. If you’re crunched on time, 15 minutes will do. If you accidentally forget about it and leave it for up to 2 hours, it will be fine. Just proceed with the stretch-and-folds as normal.
If you’re going to be gone for a while (or need to go to bed), just stick the dough in the fridge until you’re ready to resume. Give it an hour or two to come back to room temperature, then proceed with the stretch-and-folds.
First Stretch-and-Folds
Step 5: Perform 2-6 sets of stretch-and-folds, 15-30 minutes apart. See the video for the technique. Basically, with a wet hand, we’re lifting one side of the dough and bringing it to the other side, rotating the bowl 90° each time. If it still feels loose after one full rotation, go around again. If the dough starts to get sticky, wet your hand again. After each set, place the dough seam-side down and cover.
If your stretch-and-folds are spaced a bit more than 30 minutes, don’t sweat it. Just keep going, or if you’ve already done a couple sets, consider yourself in the bulk ferment stage.
Bulk Ferment
Step 6: Cover and allow the dough to ferment until doubled, usually 6-12 hours. When it’s done, it should be domed, jiggly, and give when you poke it, but still bounce back a little.
The amount of time it takes will depend on the temperature of your kitchen and whether your starter was active when you started. Warm kitchen with active starter = faster (6 hours, maybe even less if very warm), cold kitchen with cold starter = slower (12+ hours). In the winter, I often can start the dough in the afternoon, bulk ferment throughout the evening and overnight, and it still may not be ready by morning. In the summer, I have to watch it like a hawk after about 5-6 hours. Practice, practice, practice and you’ll figure out your bread’s seasonal rhythms!

Second Stretch-and-Folds
Step 7 (a.k.a. “Limp Kittens”): Before you do your second set of stretch-and-folds, prepare a banneton by coating it with rice flour or line a bowl with parchment paper. Once that’s ready, use your hand to gently loosen the dough from the bowl by making one pass around the edge.
To do the stretch-and-folds, stick both your (wet) hands under the middle of the bread, like you’re going to pick up a cat. Lift straight up, out of the bowl. It should fold over your hands, just like a kitten getting picked up by its mother. As you bring it back down, let it fold on itself. See video for a demonstration. Turn the bowl 90° and repeat.
If you’re using a parchment-lined bowl: Turn the bowl 90° and repeat, but as you bring it back down, put it in the parchment-lined bowl, seam-side down.
If you’re using a banneton: Turn the bowl 90° and repeat, but as you bring it back down, put it in the banneton seam side-up. Do a quick set of envelope folds, bringing one edge to the middle, then the opposing edge, turn 90°, and repeat, pinching it all together.
Fridge Rise
Step 8: Place the bowl or banneton in the fridge. Don’t be fooled by the name – it won’t rise much. We’re letting the gluten relax a bit and the chill from the fridge will give it a better oven spring. If you want to bake right away, put a Dutch oven in the oven and preheat to 500°F for one hour.
To bake later, cover the bowl/banneton (a plastic grocery bag or shower cap works great for this) in the fridge and wait until one hour before you’re ready to bake to preheat the oven and Dutch oven to 500°F.

Score & Bake
Step 9: Take the bread out of the fridge. If you’re using a parchment-lined bowl, just score with a bread lame or sharp knife. If you’re using a banneton, you’ll need to dump the bread out onto a piece of parchment paper, then score.
I find that deeply scoring at a 45°-angle produces a lovely ear, but a quick slash will do the trick! You can also get fancy with the scoring – there are plenty of videos all over the internet if you’re interested.

Step 10: Take the Dutch oven out of the oven and remove the lid. Quickly lift the bread up by the parchment paper and place in the Dutch oven. Replace the lid right away. Bake, covered, at 500°F for 30 minutes. Then drop the temperature to 450°F and bake uncovered for 10-15 minutes more, until the internal temperature is 204-208°F.
For a crustier, darker bread, bake uncovered for longer (possibly reduce the covered bake time if you find that your bread is burning on the bottom). For a softer crust, increase the covered bake time and reduce the uncovered time. You’ll find the sweet spot for your family!

Rest (the hardest part!)
Step 11: Remove the bread from the Dutch oven by lifting the parchment paper. Place on a cooling rack and slip the parchment paper out from below the bread to allow air to circulate freely. This is the hardest part – let it rest 1 hour before cutting into it to allow the crumb to set. Unless you plan to eat the whole loaf in one sitting. In which case, go right ahead and enjoy it!

Equipment
*Disclosure: I only recommend products that I use or would use myself. The links above are affiliate links, which means that I earn a commission (at no cost to you!) if you make a purchase using the link.

Easy Fresh-Milled Sourdough Bread for the Busy Home Cook
Fresh-milled sourdough bread doesn’t need to be fussy! Even if you’re busy or distracted, you can enjoy delicious, healthy homemade bread every night.
- Total Time: 12 hours
- Yield: 1 loaf (about 12 servings)
Ingredients
- 100g sourdough starter – Give or take 10g. Bread made with active starter will rise faster, but fridge-cold works too and is often what I use. Even relatively fresh discard will eventually rise, but it may require some patience.
- 435g filtered water – Give or take 20g. I use filtered water because unfiltered water can have contaminants and chemicals that kill the yeast, but it may still work if that’s all you have access to. I use water from a Brita pitcher and that has always worked for our family’s bread! If your starter is coming from the fridge, slightly warmed (not hot!) water will help to wake up the yeast.
- 520g hard red wheat – Hard white wheat should work too. If you don’t have fresh-milled flour, a high-protein bread flour will probably work, though you may have to tinker a bit with the hydration ratios!
- 15g fine sea salt – Give or take 5g. Don’t use iodized salt or salt with anti-caking agents as they may kill the yeast. Do not omit the salt – I once forgot it and it was the blandest bread I’ve ever made. Salt is flavor, my friends!
Instructions
- Combine starter and water in a large bowl.
- Add the flour and salt. If you have an open grain mill, like the Mockmill, you can place the bowl below your grain mill to catch the flour as it comes out. No need to dirty an extra dish!
- Mix the starter, water, flour, and salt together to combine. The dough will be thick and a bit sticky. Just do your best to get all the dry bits incorporated. It will smooth out as we do the stretch and folds.
- Autolyze: Cover the dough and allow it to autolyze (rest) for about an hour. If you’re crunched on time, 15 minutes will do. If you accidentally forget about it and leave it for up to 2 hours, it will be fine. Just proceed with the stretch-and-folds as normal.
- If you’re going to be gone for a while (or need to go to bed), just stick the dough in the fridge until you’re ready to resume. Give it an hour or two to come back to room temperature, then proceed with the stretch-and-folds.
- First Stretch-and-Folds: Perform 2-6 sets of stretch-and-folds, 15-30 minutes apart. See the video above for the technique. Basically, with a wet hand, we’re lifting one side of the dough and bringing it to the other side, rotating the bowl 90° each time. If it still feels loose after one full rotation, go around again. If the dough starts to get sticky, wet your hand again. After each set, place the dough seam-side down and cover. If your stretch-and-folds are spaced a bit more than 30 minutes, don’t sweat it. Just keep going, or if you’ve already done a couple sets, consider yourself in the bulk ferment stage.
- Bulk Ferment: Cover and allow the dough to ferment until doubled, usually 6-12 hours. When it’s done, it should be domed, jiggly, and give when you poke it, but still bounce back a little. The amount of time it takes will depend on the temperature of your kitchen and whether your starter was active when you started.
- Second Stretch-and-Folds: Before you do your second set of stretch-and-folds, prepare a banneton by coating it with rice flour or line a bowl with parchment paper. Once that’s ready, use your hand to gently loosen the dough from the bowl by making one pass around the edge. To do the stretch-and-folds, stick both your (wet) hands under the middle of the bread, like you’re going to pick up a cat. Lift straight up, out of the bowl. It should fold over your hands, just like a kitten getting picked up by its mother. As you bring it back down, let it fold on itself. See video above for a demonstration. Turn the bowl 90° and repeat.
- If you’re using a parchment-lined bowl: Turn the bowl 90° and repeat, but as you bring it back down, put it in the parchment-lined bowl, seam-side down.
- If you’re using a banneton: Turn the bowl 90° and repeat, but as you bring it back down, put it in the banneton seam-side up. Do a quick set of envelope folds, bringing one edge to the middle, then the opposing edge, turn 90°, and repeat, pinching it all together.
- Fridge Rise: Place the bowl or banneton in the fridge. Don’t be fooled by the name – it won’t rise much. We’re letting the gluten relax a bit and the chill from the fridge will give it a better oven spring. If you want to bake right away, put a Dutch oven in the oven and preheat to 500°F for one hour.
- To bake up to 72 hours later, cover the bowl/banneton (a plastic grocery bag or shower cap works great for this) in the fridge and wait until one hour before you’re ready to bake to preheat the oven and Dutch oven to 500°F.
- Score: Take the bread out of the fridge. If you’re using a parchment-lined bowl, just score with a bread lame or sharp knife. If you’re using a banneton, you’ll need to dump the bread out onto a piece of parchment paper, then score. I find that deeply scoring at a 45°-angle produces a lovely ear, but a quick slash will do the trick!
- Bake: Take the Dutch oven out of the oven and remove the lid. Quickly lift the bread up by the parchment paper and place in the Dutch oven. Replace the lid right away. Bake, covered, at 500°F for 30 minutes. Then drop the temperature to 450°F and bake uncovered for 10-15 minutes more, until the internal temperature is 204-208°F.
- Rest: Remove the bread from the Dutch oven by lifting the parchment paper. Place on a cooling rack and slip the parchment paper out from below the bread to allow air to circulate freely. Let it rest 1 hour before cutting into it to allow the crumb to set.
Notes
- The amount of time it takes will depend on the temperature of your kitchen and whether your starter was active when you started. Warm kitchen with active starter = faster (6 hours, maybe even less if very warm), cold kitchen with cold starter = slower (12+ hours).
- If your bread has over-proofed, it will begin to break apart during the second stretch-and-folds. If this happens, stop messing with it. If it’s only a little bit over-proofed, stick it in the fridge for an hour or two then try again. If it has no structure, pour it on a sheet pan and make focaccia!
- For a crustier, darker bread, bake uncovered for longer (possibly reduce the covered bake time if you find that your bread is burning on the bottom). For a softer crust, increase the covered bake time and reduce the uncovered time. You’ll find the sweet spot for your family!
- Prep Time: 15 minutes
- Fermentation & Rest Time: 11 hours
- Cook Time: 45 minutes
- Category: Appetizer, Side Dish, Snack
- Method: Baking
- Cuisine: American
- Diet: Dairy-Free, Pescatarian, Vegan, Vegetarian
Nutrition Facts
Amount Per Serving
Calories: 172 kcal
Fat: 1g
Total Carbohydrates: 35g
Fiber: 1g
Protein: 7g
The nutrition data provided here is for informational only and is only an estimate based on an online nutrition calculator. It cannot be verified or guaranteed, and should not be used in the treatment of medical conditions. It should not be considered a substitute for a professional nutritionist’s advice This data should be interpreted and used at your own risk.


Leave a Reply